BLOGGER TEMPLATES AND TWITTER BACKGROUNDS

Monday, February 6, 2012

Choco Crinkles

My dearest husband had been bugging me about baking him some chocolate crinkles. 
Last Friday i was able to fulfill his dream by buying Crinkle Cookie Mix of Celebrations by Sharon from the Maya Kitchen line of products.

What i love about this mix is that It's super duper easy to make. 

The ingredients are:

1 pack of Crinkle Cookie Mix (Celebrations by Sharon) - the Sharon Cuneta!
2 tablespoons of oil
1 medium egg
Confectioner's Sugar


After the mixture had been made:
*Scoop a ball of the mixture and drop into a plate with confectioner's sugar.
*Roll it back and forth until ball is fully covered with confectioners.
*Place it in baking sheet. 
The recipe calls for 370F for 3 to 5 minutes.
*DO NOT OVER BAKE*

Once you remove it from the oven, it will look like this:

Go forth and Bake,
Dina

Wednesday, January 25, 2012

Cupcake with chocolate ganache spider web design


Last week, i attended cupcake decorating classes. The teacher taught us simple tricks and design techniques with the use of chocolate ganache.


The toothpick made all the designs possible. From feather, spiderwebs and hearts.
It's super duper easy and fun as well.
All you need is a cupcake, chocolate ganache and some toothpicks.

1. dip your cupcake in the chocolate ganache mixture.
2. With the use of a piping bag, pipe a scroll into your cupcake, you may want to use white ganache in able
for your decoration to be visible. 

3. pipe a scroll onto your cupcake. Point your toothpick at the center of the scroll and drag it down till the edge of the cupcake. Repeat this process.

Note: You made need to do this before the ganache dries out.


Smart Tip: My Decorating teacher always do this trick whenever we use chocolate ganache. Since ganache dries out easily, she usually fill her metal kettle with 2 cups of water and she let's it boil. While the kettle boils in the stove she puts her piping bag *with ganache* on top of it. The warm temperature keeps the ganache wet and ready for decorating. 


Bake and Shake,

Dina


Grease & Flour a Cake Pan


Making cakes can be fun, but the fun goes down a notch if your cake sticks to the baking pan. In order to prevent this, you must grease and flour the cake pan before you bake the cake. Greasing and flouring a cake pan is not difficult as long as you have the proper ingredients. Plus, you only need to grease and flour a cake pan if you are making a cake that must be removed from the pan completely, such as a layer cake.


Dip the pastry brush into the shortening. Make sure the pastry brush has a generous amount of the grease on it.

Cover every inch of the pan, from the base up to the top of the sides of the pan, with shortening. Be sure to coat it evenly.

Sprinkle flour into the greased cake pan. Sprinkle about 2 tablespoons of flour at a time.


Hold the cake pan upright and shift it back and forth in order to spread the flour around the cake pan. Once the bottom of the pan is coated in flour, turn the pan on its side to coat the edges. Turn the pan in a circle while it is on its side to completely coat the entire pan. Add more flour as needed.

TipIf you are making a chocolate cake, use cocoa powder instead of flour to prepare your pan. Flour will give the chocolate cake a layer of white on the outside, while cocoa powder will not.

DID YOU KNOW? 
Always grease and flour your cake pans before you mix the ingredients or your cake might not come out right. Most batters need to start cooking immediately after being mixed, and they shouldn't sit around waiting for you to prepare the cake pans.

Bake Me, 

Dina
Thanks to: ehow.com and google.com


Betty Crocker Chocolate Chip cookie mix


I always store cookie mixes and cake mixes in my baking drawer. They are my "emergency stash", i use them when we have unexpected visitors or when my baking mood arises.
This cookie mix never fails to make my husband, son and friends drool. 
It's very easy to make and it's also awesomely delicious.


This cookie mix calls for a 1/2 cup of butter. Just divide your butter bar into two and basically that's the 
half of it. You need to cream you butter before adding the cookie mix.
*make sure that you butter is SOFTENED and NOT melted.

After creaming the butter in your mixer you can now add your chocolate chip cookie mix.
Once your butter and cookie mix become incorporated with each other, you can now add
you eggs.
Mix it for another minute and turn off you mixer.
*DO NOT OVERMIX.

Sometimes i add more chocolate chip into my cookie mixture.
*death by chocolate chip*

Once your mixture is done, use an ice cream scoop to equally divide your cookies into your cookie sheet. 

Follow the baking instructions indicated at the cookie mix box.


I always aim for soft and chewy cookies, so i remove my cookies in the oven 5 minutes before time.
*COOKIES BAKE/HARDEN EVEN AFTER YOU REMOVE FROM YOUR OVEN*

I usually let them cool and then i place them in a airtight container to maintain moisture and quality.

Try this: before indulging this cookies, put them in the microwave for 15 seconds. They will taste
like freshly baked cookies. 

Cookie Time, 
Dina


Tuesday, January 24, 2012

Frosting a cake

A pretty cake adds a bit of ceremony to an occasion, don’t you think? As far as birthdays and moments of congratulations go, I think flowers and cakes are the perfect thing for celebrating. I had a friend who used to make a pretty little cake for each friend on their birthday. So I thought I’d share with you a new little trick I learned in case you’d like to do the same: how to frost a smooth, level cake, with no crumbs in the frosting

Of course you will need a cake, buttercream (recipe of choice) and some leveled spatula. 

Once the cake is cooled, level it using a cake leveler or serrated knife. Whenever possible, I like to level the cake right in the pan, then take it out and let it finish cooling.

8-how-to-frost-a-cake

I was recently introduced to the cake icer tip, which I use with a 16-inch pastry bag. It is fantastic for laying frosting on the cake. If you don’t have one, you can improvise by piping your buttercream frosting out of a ziplock bag and using a knife to keep it on. The trick is to lay frosting on the cake, not rub it over the cake, which will pull crumbs up into your frosting.

9-how-to-frost-a-cake

If you use the cake icer tip, the jagged edge faces towards the cake, the smooth edge away from the cake.

10-how-to-frost-a-cake
Use a spatula or knife to level the frosting. It doesn’t have to be perfect, just mostly level. Again, try to press the frosting against the cake, not rub it up from the cake.
If you put strips of parchment under the cake, carefully pull them out.
Let the cake sit for 15 minutes to let the frosting dry a bit on the outside.
11-how-to-frost-a-cake
This is the last step, the fun part. Use a piece of parchment paper or a paper towel and lay it right on the cake. Use your finger to press lightly over the cake and smooth the icing, then peel the paper away. Do the same for the sides. You can pull it  up and press it back on several times to get the cake as smooth as you like it.
Note: If you use a papertowel with an embossed pattern, you can have the pattern transfer to your cake. If this is the effect you’re going for, make sure you use the embossed side of the paper towel against the cake. And for this effect, you get only one shot of laying down the paper and peeling it away; you can’t re-lay the paper once you’ve peeled it away.
Happy Frosting, 
Dina


Thursday, January 19, 2012

Kid Friendly Homemade Ice Cream


Homemade Vanilla Ice Cream 

2 TB sugar
1 cup half & half (or light cream)
1/2 tsp vanilla extract
1/2 cup coarse salt or table salt(I used canning salt)
ice
gallon-sized Ziploc bag
quart-sized Ziploc bag


Thanks to: Kim and Pinterest for this. 

Ice Cream,
Dina


Lemon Drop Cupcakes


I only use lemon for 3 purposes.
1. i always drink lemon water
2. Tequilla purposes.
3. Lemon Drop Cupcakes
I adapted this recipe from http://partypatisserie.com
Oven 350 degrees F : Bake 18 minutes.(depending on your oven)
*if your using an electric oven check your cupcakes 5 or 10 minutes before time. 
  • 3/4 cup butter
  • 3 eggs
  • 1 3/4 cups all purpose flour
  • 1 teaspoon baking powder
  • 1/4 teaspoon baking soda
  • 1/4 teaspoon salt
  • 2/3  cup milk
  • 1/4 cup milk
  • 1 1/2 cups sugar
  • 1 tablespoon finely shredded lemon peel
  • 1 recipe Lemon Frosting
  • 1/2 cup lemon drop candies, finely crushed
l. Allow butter and eggs to stand at room temperature for 30 minutes. Meanwhile, line twenty 2 1/2-inch muffin cups with paper bake cups. In a medium bowl stir together flour, baking powder, baking soda, and salt. In a 2 cup glass measuring cup combine the 2/3 cup milk and set aside.
2.Preheat oven to 350 degrees F. In  a large bowl beat butter with an electric mixer on medium to high speed for 30 seconds. Add sugar and lemon peel; beat until combined. Add eggs, one at a time, beating well after each addition. Alternately add flour mixture and milk mixture to butter mixture, beating on low speed after each addition just until combined.

3. Spoon batter into prepared muffin cups, filling each about  three-fourths full. Use the back of a spoon to smooth out batter in cups. Bake for 18 minutes or until tops spring bakc when lightly touched. Cool cupcakes in  muffins cups on wire racks for 5 minutes. Remove and cool.


4.Up to 1 hour before serving, generously spread or pipe Lemon Frosting onto cupcakes. I crush lemon candies and sprinkle on the top.
LEMON FROSTING: Allow 1/3 cup butter to stand at room temperature for 30 minutes. In a large mixing bowl beat butter, 1/3 cup shortening, and 1 teaspoon vanilla with an electric mixer on medium speed for 30 seconds. Slowly add 2 cups powdered sugar, beating well. Add 2 tablespoons lemon juice. Gradually beat in 2 cups additional powdered sugar. Beat in 1 to 2 tablespoons milk, 1 teaspoon at a time until frosting reaches spreading consistency. Makes about 2 1/2 cups frosting.

Bake me, 

Dina

Wednesday, January 18, 2012

Cookie Dough Recipes

Cookie dough makes me feel like a messy girl with pigtails, beaters, and a big grin - all over again! I love cupcake batter, but cookie dough is in a class of its own.


Note: Pregnant women should refrain from eating cookie dough due to raw eggs in it. (although - there are some debates about the dangers of eating raw egg.)

What to Do With Raw Cookie Dough

There are countless things to do with raw cookie dough. Some ideas are:
  • Mix it with vanilla ice cream for your own homemade cookie dough ice cream.
  • Swirl it in with fudge for some cookie dough fudge.
  • Spread a layer of it in between two cakes instead of frosting. This would be awesome with cheesecake.
  • Just leave it sitting around with a spoon and eat some periodically.
  • Make cookie dough cupcakes

Raw Cookie Dough Recipe

Note: To make it egg-less, I used milk to replace the moisture from the eggs. It worked perfectly!
  • 2 C all-purpose flour
  • 1/2 t salt
  • 3/4 C unsalted butter, melted
  • 1 C packed brown sugar
  • 1/2 C white sugar
  • 1 T vanilla extract
  • 4 T milk
  • Any amount of any mix-in you'd like - t chocolate chips, nuts, or fruit would all work.
  1. Mix all ingredients in a big bowl. That's it!
If you are not pregnant then you could go for the ordinary cookie dough recipe also known as "the ultimate mind blowing cake". I adopted this recipe from tidymom.net and it never fails to make me forget my name (its that delicious)

Recipe: Chocolate Chip Cookie Dough Cupcakes

Summaryyields 24 cupcakes

ingredients

  • 3 sticks unsalted butter, at room temperature
  • 1½ cups light brown sugar, packed
  • 4 large eggs
  • 2 2/3 cups all-purpose flour
  • 1 tsp. baking powder
  • 1 tsp. baking soda
  • ¼ tsp. salt
  • 1 cup milk
  • 2 tsp. vanilla extract
  • 1 cup chocolate chips (semisweet or bittersweet)

instructions

  1. preheat the oven to 350° F.
  2. Using the paddle attachment on your mixer, combine the butter and brown sugar. Cream together on medium-high speed until light and fluffy, approx 3 minutes. Add eggs one at a time, beating well after each addition and scraping down the sides of the bowl .
  3. Whisk the flour, baking powder, baking soda, and salt together in a medium bowl.
  4. Alternating add the dry ingredients to the mixer bowl with the milk on low speed, beginning and ending with the dry ingredients, mixing each addition just until incorporated.
  5. Blend in the vanilla.
  6. Fold in the chocolate chips with a spatula.
  7. Divide the batter evenly between 24 cupcake liners. Bake for 18-20 minutes, until a toothpick inserted in the center comes out clean. Allow to cool in the pan for 5-10 minutes, then transfer to a wire rack to cool completely.

quick notes

While the cupcakes bake and cool, prepare your cookie dough filling.


Thanks to: tidymom.net and cupcakeproject.com


Wilton Script Message Press Set

One of my frustrations as a baker is to learn how to write messages and dedications on cakes. I want to be like the bakers from goldilocks who writes dedications on cakes in a free-hand basis. They dont have patterns, all they have is a small piping gel and they scribble "happy bday to you, you belong to the zoo" without breaking a sweat. 
*that message was just an example, i usually just put happy birthday to cakes".

Moving on, sometimes i want to talk to goldilocks bakers/employees and ask them to teach me how to pipe wonderful letters, also i'll ask them for their choco roll recipe and i'll make big bucks out of it. LOL. (I'm just laughing but im dead serious regarding the choco roll recipe). 

My frustrations was semi-solved when my sister sent me this babies.

Icing tips and Buttercream


I've been using buttercream and boiled frosting for years now. If i have to choose, ill still choose liquid frosting (royal icing, butter cream and boiled icing)over fondant. I love decorating cupcakes with buttercream while using different icing tips. 

There are different icing tips available on the market. 
(I personally buy in sweetcraft or chocolate lovers castle) 

Rainbows Frosting and Rainbow Cake

Brilliant Rainbow Frosting Idea. Your colors will depend on how dark you want it to be. Sometimes i do lighter versions of the rainbow colors.
You can also try this technique:

Try this: cupcake cones


A step-by-step procedure on how to bake cupcakes with the use of ice cream cones. 
Thanks to: google.com for the images. 

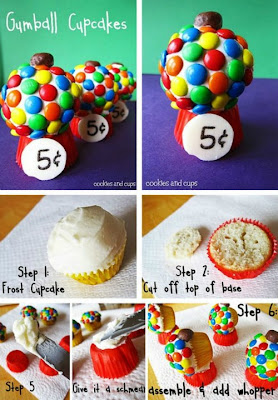
How to make Gumball Cupcakes

Besides from rainbows, i am also fascinated by gumball machines, cameras and tin can lunch boxes.
For now, lets focus on my fixation regarding gumball machines. There's something about gumball machines that makes me all happy and bubbly. I'm really not into the whole bubble gum thing but i just love how it looks and how the different colors of the bubblegum burst into one attractive sight.
Anyway, i was browsing online when i came across this picture.

it's too cute to be unnoticed and i really need to make this one.
*Id like to take this opportunity to thank the "INTERNET", you make all things possible.*

After minutes of research, i came across this detailed instructions on how to turn ordinary cupcakes to outstanding gumball cupcakes.


The picture lack steps but you can pretty much figure out how its done.
Obviously, you need 2 cupcakes, a spatula, buttercream frosting and m&m's. 

I will try this one really really soon. 

Happy baking, 

Dina

Cake Pops

I love Cake Pops! They are fun and easy to make. A Cake Pop is a Ball of cake with icing on a stick. Cake Balls and Cake Pops make great treats as well as giveaways to children's party and other occasions, its like a lolli-cake (lollipop  cake on a stick) with super duper cute design. 
My first attempt with cake pops was last July2011. All i did was i baked some cake, then i mashed it into tiny little pieces, i added some butter cream to the cake and when it was firm enough to make a shape, i made balls out of the mixture. 
I then placed my cake balls into the ref and let them rest for an hour or so.
I poked each cake balls with sticks and then i dipped them to my chocolate ganache. 

IT TASTED AWESOME. 

Anyways, Here's a step-by-step procedure on how to make cake pops..

Tuesday, January 17, 2012

How to Make Rainbow Cupcakes

If there's one thing i love more than rainy days, it's definitely rainbow days. I've always been a fan of the colors of the rainbow. ROYGBIV, i know it's colors by heart. For me, the rainbow is a symbol of happiness and it also brings back memories of me and my sisters when we were young. 


Anyway, since i'm super duper fond of rainbows i make sure to make rainbow cakes and cupcakes once in awhile.
NOTE: This cake contains happiness. When i bring rainbow cupcakes to friends they always seem to go "oohh" "ahhhh", "how did you do this?", "i love the color combination" and the compliment goes on and on.


Sometimes I struggle with what I want to bake and bring to parties. There are so many things that factor into my decision: portability, travel-bility, allergies, in/formality of event, age group of dessert eaters etc etc. But this time I knew exactly what I wanted to make. So I threw caution to the wind. I didn’t even think twice about it. Whenever i feel confused on what to bring, i always go for rainbow cupcakes with frosting. Trust me, it won't let you down. 


Let me share one of my favorite cupcake recipe of all times.


mini cupcake stand

Just Sharing: 


Thanks to: pinterest.com for the image. 

Monday, January 16, 2012

Anatomy of a Cupcake

cup·cake

[kuhp-keyk] 
1. a small cake, the size of an individual portion, baked in a cup-shaped mold.
We love the computer graphics, visual descriptions represented in a graphical way, very easy to understand, such as this anatomy of a cupcake, where its various parts are differentiated as the topping, frosting, cupcake mass and its infinite ingredients, and of course the liners.
Thanks to:  Oh Cupcakes for the image:)
Happy Caking,
Dina